by Adam Young | Sep 16, 2015
Login to your cpanel webmail account and select your preferred client and follow the steps for your client
Horde
Once your in the Horde client do the following
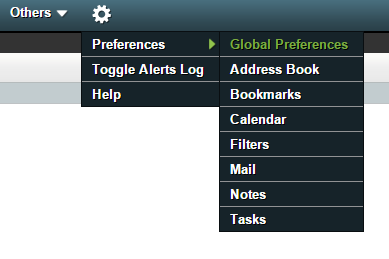
1. Hover over the gear icon on the top bar and select Global Preferences
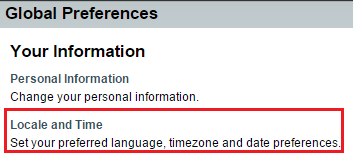
2. Click on Locale and Time
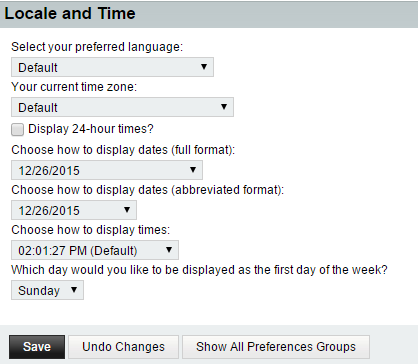
3. Select the time zone that you would like to use then click Save Options.
Roundcube
Once your in the Roundcube client do the following
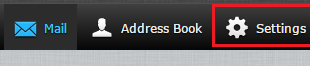
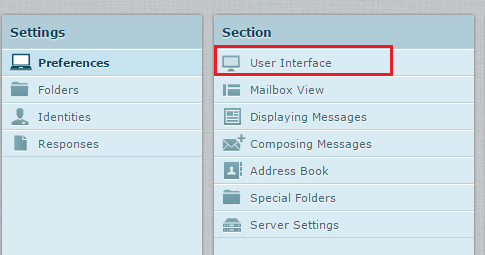
1. Click Settings
2. Click User Interface
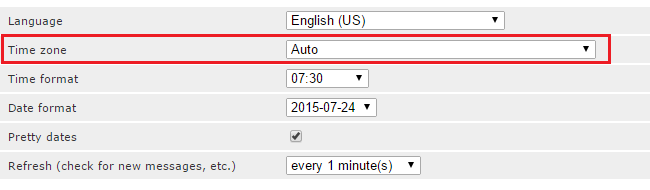
3. Select the time zone that you would like to use
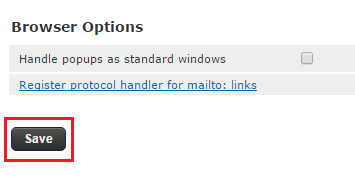
4. Click Save
SquirrelMail
Once your in the SquirrelMail client do the following
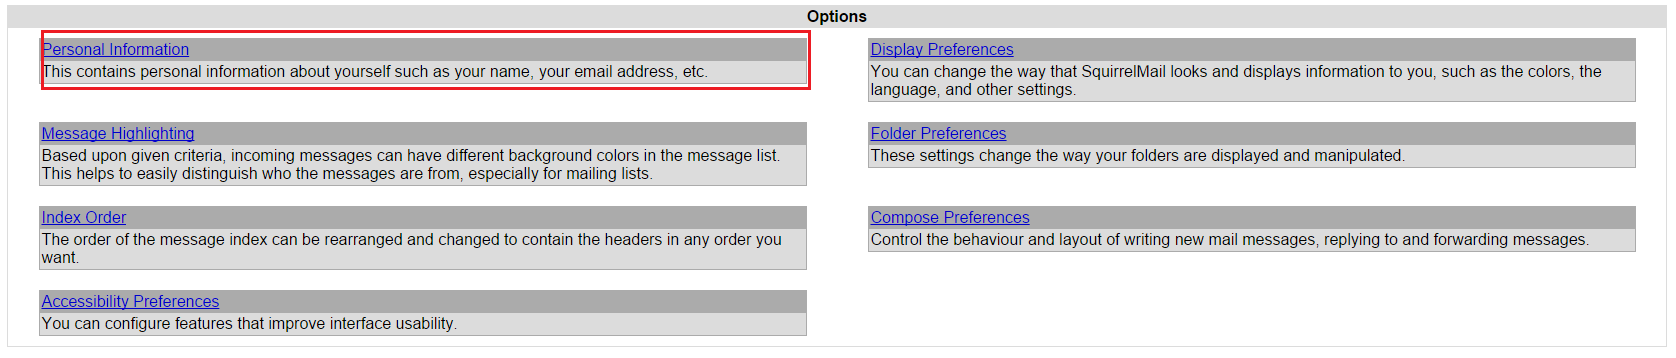
1. Click Options

2. Click Personal Information
3. Under Timezone Options, Select the time zone that you would like to use

4. Click Submit

by Adam Young | Sep 16, 2015
Username – your email address (eg. info@example.com)
Password – The email account’s password
Incoming Server – mail.example.com (change example.com to your domain name)
Incoming ports
Outgoing Server – mail.example.com (change example.com to your domain name)
SMTP outgoing ports
- 25 for most servers
- 587 or 80 should work if port 25 does not
by Adam Young | Sep 15, 2015

- Tap the Applications icon on the home screen
- Tap Email
- Enter your email address and password and tap Manual setup
- Tap the account type
- Enter you account information and tap Next
- In the Username field, enter your email address
- In the Password field, enter the password for the email account
- In the IMAP server field, enter the domain for your email account
- In the security field, select SSL/TLS this setting will automatically set the correct port for you
- Enter your server information and tap Next
- In the SMTP server field, enter the domain for your email account
- In the Security field, select SSL/TLS, this setting will automatically set the port for you
- Select Require sign-in checkbox
- In the Username field, enter your email address
- in the password field, enter the password for your email account
- Select your email preferences and tap Next
- Enter your account and display names, and tap Next
- Now if you have entered everything in correctly your email will now be working on your Android device
by Adam Young | Sep 15, 2015
- On your iPhone open settings from the home screen
- Open Mail, Contacts, Calendars
- Tap “Add Account”
- Tap “Other”
- Tap “Add Mail Account”
- Enter your account information and tap Next
- Select mailbox type and verify information
- Enter information for your incoming mail server and tap Next
- Disable Notes and tap Save
- Now your email should be coming to your mobile
Note:
Generally your mail server will be mail.domainname.com (replace domainname.com with your domain)
by Adam Young | Sep 6, 2015
How to create a new cPanel email account
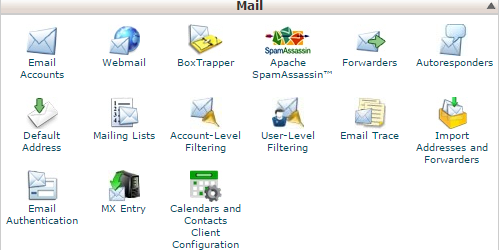
1.Log into your cpanel account.
2.Under the Email section click on accounts.
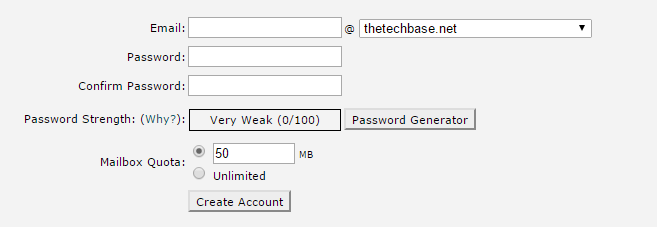
3.Under add Email Account, enter the following information.
Email – What you want the new email to be eg. John.
Domain – The domain name you want the email for.
Password – The password for the new email account.
Mailbox quota – The amount of data that the mailbox in allowed to use.
We would like to point out 2 things
First: When the email account has used all of its Mailbox quota the email account will not be able to receive any new emails till some of the older ones have been deleted and the email account has space available.
Second: All used space by your email accounts will count toward your hosting account disk space usage.
by Adam Young | Sep 6, 2015
How to access cPanel webmail account
In this article we are going to show you how to access your cpanel webmail.
After adding an email account you will want to be able to access it, one way to access your new email account is by webmail.
1. Enter the following address into your web browsers address bar “http://example.com/webmail” (make sure that you replace example.com with you own doman name).

2. Enter your full email address as your username.
3. Enter the password for the email account.
4.Once you have logged in you will need to select the webmail client that you want to use. (We like other sites use and recommend that you select RoundCube).

5. You can now use your webmail to read and send mail.
by Adam Young | Aug 27, 2015
- Plug the flash drive into the computer
- Find the files that you would like to copy
- Right click on the file and select copy
- Open the start menu and click on computer
- Double click on the removable disk that is associated with the flash drive
- Right click in the white area of the window, then select paste
by Adam Young | Aug 18, 2015
For this tutorial we will be using cPanel for the web hosting platform, most of the steps will be the same on any of the hosting platforms that you will be using.
1. Log on to your cpanel server
2. Go down to the database section and click on phpMyadmin
3. Click on the link to your databases
4. All your databases will now be listed, select the database for the site that you wish to change the URL for
5. All the tables for that database will now be shown on your screen
6. From this list look for wp_options
7. Click on browse next to wp_options to open the table
8. Under the field option_name look for siteurl and click edit
9. Now the edit field window will open
10. In the input box for option_value, change the URL to the new address
11. Verify that the URL that you have entered is correct and theirs no spelling mistakes, once to happy click Go to save the new URL
12. Now you should have been returned to your wp_options table
13. Look for the home field in the table and click edit
14. In the input box for option_value, change the URL to the new address
15. Verify that the URL that you have entered is correct and theirs no spelling mistakes, once to happy click Go to save the new URL
by Adam Young | Jul 29, 2015
For this easy tutorial you will need to have administrator access to the server its self .
1. Login to the server eather by SSH or locally on the host.
2. Change the directory to etc/php/apache2
cd /etc/php/apache2
3. Open the file php.ini
nano php.ini
4. Change the valve on the line contaning post_max_size =
5. Close and save the php.ini file
6. Now your Server runing Sentora should allow you to upload larger files up to the size you have now allowed.
by Adam Young | Jul 15, 2015
If your WordPress site gets hacked and your password gets changed or you forget your administrator password dont fear as its easy to create a new admin user account from the database in this tutorial we will show you how easy this is with your web hosting control panel and PHPMyAdmin.
In this tutorial the we hosting control panel we will be using is cPanel.
If your website is being hosted with a different panel such as Sentora or Plesk please search our site for tutorial on how to access PHPMyAdmin on that panel.
1. Login to your cPanel account
2. Go to the Databases section and click on “PHPMyAdmin”
3. Select your WordPress Database
4. Go to the wp_users table and click on “insert”
5. Now fill in the table entry
- ID – Keep the value of this field empty (the value will be automatically assigned)
- user_login – insert the username you want to use
- user_pass – add a password for the account. Select MD5 in the functions menu
- user_nicename – you can leave this field empty
- user_email – add the email address you want to use for this account.
- user_url – you can leave this field empty
- user_registered – select the date/time for when this user is registered
- user_status – set this to 0
- display_name – leave this field empty for now
6. Click on the “Go” Button, if successful you should receive a success message
7. Now you should be back at the wp_users table where you can see all the entries for this table, take note of value if the “ID” field as we will need it in the next step
8. Go the the wp_usermeta and click “insert”
9. Use the following values for the new table entry
- unmeta_id – Keep the value of this field empty (the value will be automatically assigned)
- user_id – This is the ID of the user we created in the previous step.
- meta_key – Use wp_capabilities
- meta_value – Use the following value for this field: a:1:{s:13:”administrator”;s:1:”1″;
10. Click on the “Go” Button, if successful you should receive a success message. now you should be able to login to you WordPress site with the new account that you just set up