by Adam Young | Dec 25, 2014
1. Open the Server Manager console, click “Add roles and features”
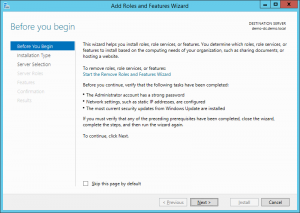
2. Select “Role-based or feature-based installation
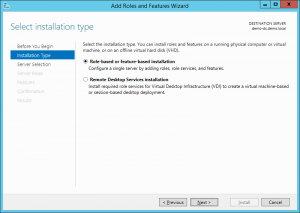
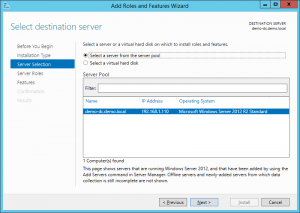
3. Choose the server that you want the WSUS role installed on from the server pool
4. Scroll down to select “Windows Server Update Services” (some features such as .Net and IIS will need to be installed which it all ask for)
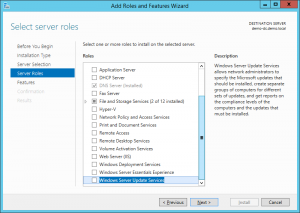
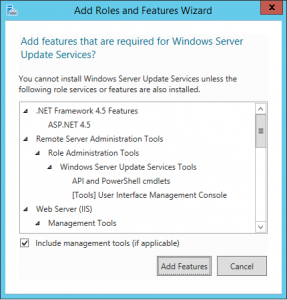
5. Click next 4 times
6. On “Content Location” you will need to specify where you want the updates to be stored on the server
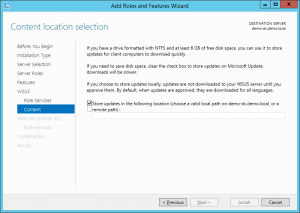
7. Click next 3 times
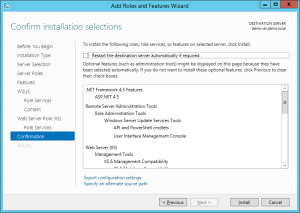
8. Click “Install” on the Confirmation section
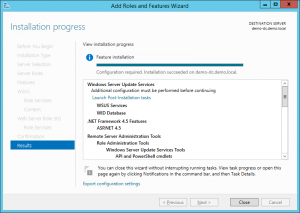
9. Once the installation is complete you will see that the results section will say “Configuration required. Installation succeeded on server name” and the installation status bar will be full
Watch Video on how to install WSUS on Server 2012
[jwplayer mediaid=”591″]
To see how to configure WSUS on server 2012 please go to the next page
by Adam Young | Dec 25, 2014
1. Log on the the Server 2012 server that is the Domain Controller for your network
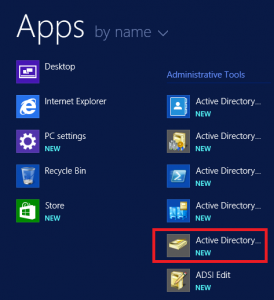
2. On the metro interface open double click on Active Directory Users and Computers
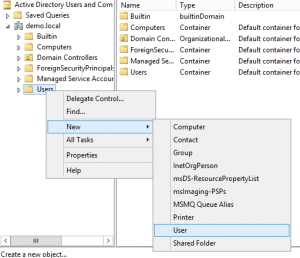
3. Right click the Organizational Unit where you would like to create the new user account hover over “New” then click “User”
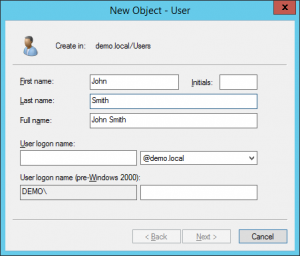
4. Fill in the users information
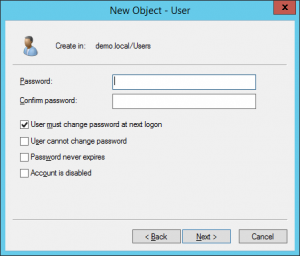
5. Give the new user account a password and confirm, and check any of the boxes that you require then click “next”
6. Click “Finish” to create the new user account
Watch Video on how to add a new domain user on Server 2012 R2
[jwplayer mediaid=”597″]
by Adam Young | Dec 25, 2014
Why would you want to add a user to a Security Group?
Security Groups are used to give users access to files and resources.
Such as :
- Workstations
- Network drives
- e-Mail
- Printers
- Phones
- And more
So if you want to learn how to add a user to a Security Group follow the easy steps below!
1. Log on the the Server 2012 server that is the Domain Controller for your network
2. On the metro interface open double click on Active Directory Users and Computers
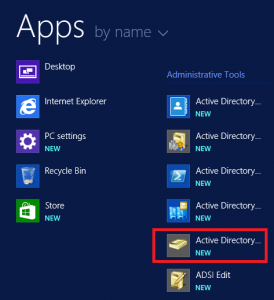
3. On Active Directory Users and Computers screen expand the current domain name
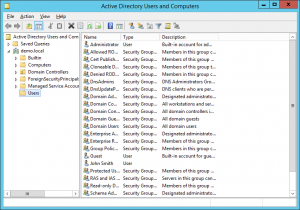
4. Locate the Organizational Unit that has the user account that you wish to add to another Security Group
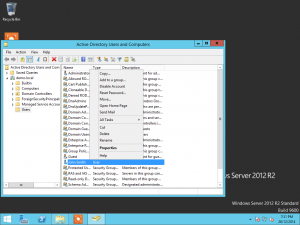
5. When you have found the User Account that you want right click the account and click “Add to a group”
6. If you know what the Security Group’s name is type it in the area given and click “Check Names” to verify
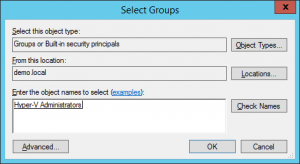
7. once the group has been verified click “OK” to add the user to the Security Group
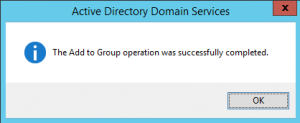
8. If you added the user to the Security Group successfully you should get this screen at the end now click “OK” to go back to Active Directory Users and Computers
Watch Video on how to add a security group to a domain user in Server 2012 R2
[jwplayer mediaid=”599″]
by Adam Young | Dec 25, 2014
If your like us here at DelmarIT and have Hyper-V servers running Server 2008, Server 2008r2, Server 2012 and Server 2012r2 maybe you have noticed that you cant import VMs running on Server 2008 or 2008r2 into Hyper-V running on Server 2012r2 or Windows 8.1
Now there is a work around for this as you can see on the table below that you can import a VM from Hyper-V running on Server 2008 and 2008r2 to Hyper-V running on Server 2012, once the VM has been imported over to Hyper-V on Server 2012 you are now able to import it over to Hyper-V running on Server 2012r2 or Windows 8.1
If you would like more information on this can be found on a TechNet Forum by Taylor Brown (MSFT)
by Adam Young | Dec 24, 2014
1. On one of your Domain Controllers open the DNS console
2. Expand Forward Lookup Zone
3. Expand <Domain Name>
4. Expand _Sites
5. Expand <Site Name>
6. Expand _TCP
7. Double click the resource record of the server that you do not want as the primary Domain Controller for this site
8. Change the priority to something other than zero as zero is the highest priority.
by Adam Young | Dec 24, 2014
I recently opened up Google Chrome up on my computer running Windows 8.1 Pro and it was in Windows 8 mode which made it hard for me to do my daily activities that needed to get done.
Running Google Chrome in Windows 8 mode would be good for someone who is using a tablet or similar device or who prefers to use apps inset of the old style
To enable Windows 8 mode
1. Open Google Chrome
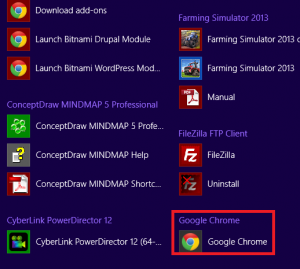
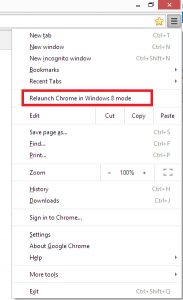
2. Open the settings menu

3. Click on “Relaunch Chrome in Windows 8 mode”
To disable Windows 8 mode
1. Open Google Chrome

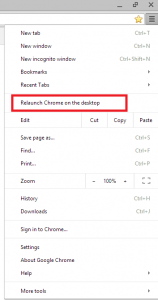
2. Open the settings menu

3. Click on “Relaunch Chrome on the Desktop”
by Adam Young | Dec 24, 2014
For this your computer will need to be connected to the internet
Follow these simple steps when logged into a Windows 8 computer with a local account
1. when on the Metro start screen click Desktop to go to the Desktop
2. From the Desktop move your mouse to the bottom right corner of the screen
3. From the displayed menu right click on Settings
4. On the bottom of the Settings pane click Change PC Settings
5. In the PC Settings window, select Users from the left pane
6. On the right side of the screen click Switch to a Microsoft account under Your account section
7. On Sign in with a Microsoft account screen specify the password for the local user account
8. Click next to continue
9. From the next screen, click Sign up for a new email address
10. On Sign up for a new email address window fill in the available fields with your information and click next
11. On the Add security info screen provide the required information in the fields and click next
12. On the Finish up screen type the characters in the space provided and then click next
13. On the next screen click on Finish to log into the computer with the new Microsoft account
by Adam Young | Dec 24, 2014
1. Open the Run Box by pressing the Windows and R keys on the keyboard at the same time
2. Type “netplwiz” in the Run Box and press enter
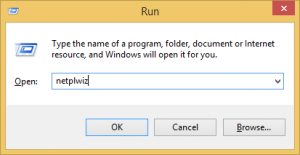
3. This will now open the User Accounts window, where all the user accounts on the computer will be shown
4. Select the user account that you want to auto login and then uncheck the “Users must enter a user name and password to use this computer”
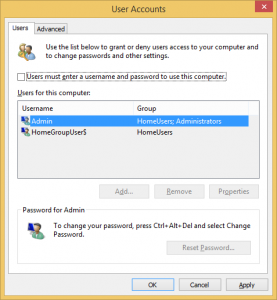
5. Click the apply button
6. This will now bring up the Automatically sign in dialog, where you will need to input the password for the user account that you want to auto login
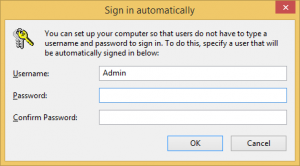
7. Click “ok” and click “ok” again on the User Accounts screen
Watch Video on how to setup automatic logon for Windows 8 and 8.1
[jwplayer mediaid=”595″]
by Adam Young | Dec 16, 2014
You Probably are used to using hotkeys in Windows 7 or older versions, Windows 8 uses a lot of the old hotkeys and has some of its own.
Windows Key – brings up the Metro start screen
Windows Key + C -Brings up the Charms menu
Windows Key + D – Brings up the Windows Desktop that your used to
Windows Key + F – Brings up the Metro file search screen
Windows Key + H – Opens the Metro share panel
Windows Key + I – Opens the settings panel
Windows Key + J – Switches focus between snapped Metro applications
Windows Key + K – Opens the devices panel
Windows Key + Q – Brings up the Metro application Search screen
Windows Key +W – Brings up the Metro stings search screen
Windows Key + Z – Opens the app bar for the current Metro application
Windows Key + , – Aero peak at the desktop
Windows Key + . – Snaps the current Metro application to the right side of the screen
Windows Key + Tab – Opens the Metro application switcher menu
Windows Key + Page Up / Down – Moves the current application to the other screen
Windows Key + Shift + . – Snaps the current Metro application to the left side of the screen
by Adam Young | Dec 16, 2014
1. Click on the Start button to bring up the start menu

2. Click on Control Panel to open
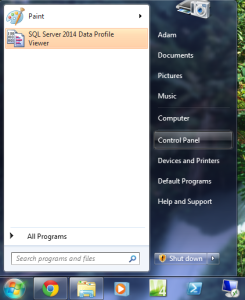
3. Under the User Accounts and Family Safety category, click on Add or remove user accounts

4. The Manage Accounts window will open where all the current user accounts on the computer will be displayed, click on Create a new account
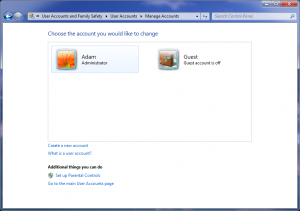
5. The Create New Account window will open, this is where you will type the name for the new user account. As well as select the user account type for the new user (Standard user or Administrator account)
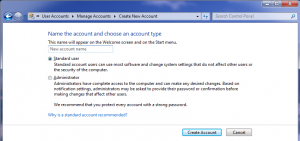
6. Once you have given the new account a name and selected the user type, click on the Create Account button
7. The Manage Accounts window will open again and you will now be able to see the new user account listed with the other accounts you already had


